ASSIGNMENT
You will be creating 1 photos for each of the following darkroom techniques. When finished you need to load them all into a powerpoint and label them with the appropriate technique. (You will have a total of 6 photos) Save your powerpoint to the V:/ drive, in the correct folder for your class and assignment.
You will be creating 1 photos for each of the following darkroom techniques. When finished you need to load them all into a powerpoint and label them with the appropriate technique. (You will have a total of 6 photos) Save your powerpoint to the V:/ drive, in the correct folder for your class and assignment.
Digital Darkroom
A darkroom is a room that can be made completely dark to allow the processing of light sensitive photographic materials, including photographic film and photographic paper. Darkrooms have been created and used since the inception of photography in the early 19th century. Darkrooms have many various manifestations, from the elaborate space used
by Ansel Adams to a retooled ambulance wagon used by Timothy H. O'Sullivan From the initial development to the creation of prints, the darkroom process allows complete control over the medium.
Due to the popularity of color photography and complexity of processing color film and printing color
photographs and also to the rise, first of Polaroid technology and later digital photography, darkrooms are decreasing in
popularity, though are still commonplace on college campuses, schools and in the
studios of many professional photographers.
If you would like to learn more about darkroom photography you can sign up for Film Photography at East Campus. You learn how to shoot and develop your own film and then print your own photos in the darkroom using an enlarger.

, Daguerreotype
Louis-Jacques-Mande Daguerre invented the daguerreotype in 1839. Within a few years, daguerreotype studios appeared in United States cities and the popularity of the medium grew through The 1850s.
Daguerreotypes were popularly and primarily used for portraits. Unlike most photographs today, in which images are printed from transparent negatives onto paper, the daguerreotype was a polished copper plate upon which an image was directly exposed. No negative used in the process and so each daguerreotype was a unique, one-of-a-kind object. With its brilliant, mirror-like surface and its ornate case, small enough to hold in the hand or carry in the pocket, the daguerreotype was suited to a vivid and intimate representation of a loved one.
Follow the link below to create some daguerrotype photos, I suggest selecting a portrait for this one
http://photography.tutsplus.com/tutorials/quick-tip-create-your-own-daguerreotype-in-photoshop--photo-5568

Cyanotype
Cyanotype is a photographic printing process that
produces a cyan-blue print. Engineers used the process well into the 20th
century as a simple and low-cost process to produce copies of drawings,
referred to as blueprints. The process uses two chemicals: ammonium
iron(III) citrate and potassium ferricyanide.
Follow the link below to create cyanotype photos. I suggest an elements of art photo or architecture for this one
http://www.canadiannaturephotographer.com/cyanotype.html

Solarization
Solarisation (or solarization) is a phenomenon in photography in
which the image recorded on a negative or on a photographic print is wholly or
partially reversed in tone. Dark areas appear light or light areas appear dark.
The effect was usually caused by accidentally exposing an exposed plate or film to light during developing.
Artist Man Ray perfected the technique which was
accidentally discovered in his darkroom by his assistant Lee Miller. It is evident from publications in the 19th century that this phenomenon was invented very many times by many photographers as it
tends to occur whenever a light is switched on inadvertently in the darkroom while a film or print is being developed.
Follow the link below to create solarized photos. I suggest a Rules of Composition or Chicago photo for this one.
http://photography.tutsplus.com/tutorials/quick-tip-using-adobe-photoshop-to-create-a-solarised-photograph--photo-5973

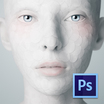
Sepia Toning
Open another photo in photoshop. Portraits are best for Sepia Toning.
Change the photo to Black & White. Image>Adjustments>Black&White.
Apply a Photo Filter. Image>Adjustments>Photo Filter

Under Filter Select Sepia or Warming Filter, Color should be a shade of brown or orange.
Make sure Perserve Luminosity is checked and adjust the density to your liking.
Make sure Perserve Luminosity is checked and adjust the density to your liking.

Kallitype
Open another photo in photoshop.
Adjust the Threshold by going to Image>Adjustments>Threshold
Depending on your photo, adjust the threshold level to between 50-90.
Select the blacks in your photo by going to Select>Color Range, click OK.
Pick a dark blue color and paint over the selected areas with a large brush.
Press CTRL D to deselect the selected areas.
Grittiness is a quality of Kallitypes. In order to create this quality apply a filter by going to Filter>Filter Gallery>Artistic>Film Grain. Adjust the sliders until to get a desired result.

Gum Dichromate
Popular at the turn of the last century though first used fifty years earlier-the process uses dichromated gelatin, a light-sensitive compound, along with a color pigment. After exposure, the unexposed gelatin is flushed from the paper surface and the remaining image is contact-printed in bright light. Skilled artists can add a second, differently tinted layer to build up multicolored composite images.
Visually, the effect delivers strange, muted colors. In fact, it is less a color process, more the precise coloration of a grayscale image with a limited tonal range.
Gum dichromates were originally photograms than photographs, but any bold image is a good starting point. Stilllifes and portraits wor/( best, as this abstract view of a gear mechanism will demonstrate. It already has a restricted tonal range, so we need not make any changes to the tonality.

(Begin by opening one of your photos in photoshop. (choose one that has a good value range and texture)
Convert it to Black and White. Image>Adjustments>Black&White
Go to Select>Color Range. Set the Fuzziness to 80 and use the eye dropper to select a middle gray in your photo. Then click OK. (You will see a large portion of your photo has been selected.
Convert it to Black and White. Image>Adjustments>Black&White
Go to Select>Color Range. Set the Fuzziness to 80 and use the eye dropper to select a middle gray in your photo. Then click OK. (You will see a large portion of your photo has been selected.

Select a blue/gray color and a large brush and paint over your entire image. You will see that the color will only be painted in the selected area.
When you are finished press CTRL D, to deselect the area.
When you are finished press CTRL D, to deselect the area.

Repeat the process for highlights (make them pink), and shadows (make them maroon).
Use muted colors.
Use muted colors.

Gum Dichromate
Finished Example.
Finished Example.